CentOS/RHEL and wrong Network Interface
This is a quick entry on a particularly irritating CentOS peculiarity – after you clone a virtual machine, your /etc/sysconfig/network-scripts/ifcfg-eth0 no longer gets invoked. This is because CentOS can arbitrarily assign the physical network card to a different logic interface such as eth1. Read on for a quick tutorial on how to identify and fix this problem.
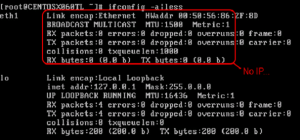
Many times after provisioning CentOS box you will notice that ifconfig -a doesn’t show the connected vSphere network adapter:
Take a look closely at the above drawing. The logical eth1 interface has no network traffic (no RX received or TX transmitted packets), and there is certainly no IP address. However, I know for a fact that this VM – before cloning – had the logical eth1 interface properly bound to the physical network card (NIC) presented by VMware to the guest OS (eth0).
So what happened??
Many of you already know this, but CentOS / RHEL can (and do!) arbitrarily reassign a “physical” network adapter (MAC address) to a new interface (“ethX“). By default we expect the network adapter to be assigned to eth0 and we have /etc/sysconfig/network-scripts/ifcfg-eth0 – in the above shot, CentOS assigned the VMware-presented “physical” network adapter to eth1. (It’s always best to put quotes around that word “physical” when you’re talking about a virtualized environment!) Thus…no network connectivity!
There are many ways to fix this problem: create a new file /etc/sysconfig/network-scripts/ifcfg-eth1 to match the CentOS values, run ifconfig commands manually to set this value, or update the udev files to force CentOS to use the desired interface.
For this blog entry, let’s take the third approach and update the udev file to fix this problem: first, locate and edit /etc/udev/rules.d/70-persistent-net.rules and modify as shown in the screenshot below:
Look at the shot above: Do you see the circled area? In the original template VM, this file had eth0 as the named PCI device (via the NAME element from the screenshot). However, the *cloned* VM had that value replaced with eth1. (Maybe a CentOS / RHEL expert can share with us the logic behind this action…all I know is that it happens, not *why* it happens!)
To fix this problem: Find the interface in the udev file and modify the NAME variable to be eth0 as indicated above. While at it, open /etc/sysconfig/network-scripts/ifcfg-eth0 and verify that no MAC address is specified. This allows the system to auto-bind to the correct interface. Then reboot the VM and all should be well:
Ah – now we see that our eth1 interface has the IP address 172.24.7.249 assigned to it which is exactly what we wanted. Victory!
Hope you all enjoyed this quick article, let me know if you have any questions or comments.


This reply from David Little on the Linked-In CentOS group discussion (http://www.linkedin.com/groupItem?view=&gid=22405&type=member&item=272565976&qid=90d8126c-b909-4e96-8667-84c63ea4d27b&trk=groups_most_popular-0-b-ttl&goback=%2Egde_22405_member_272565976%2Egmp_22405):
“RHEL/CentOS will assign an interface number when a new NIC is added to the system. It already had an eth0 so it created eth1 when the clone was kicked off, then VMware deletes the original interface but it doesn’t update anything in the guest OS.
I think the best way to work around this if you do a lot of cloning is to just have an RHEL template without network adapters and then post customization scripting for network configuration.”
Thanks David!
In Centos 7 new variable NAME appeared in /etc/sysconfig/network-scripts/ifcfg-enp13s0. Does anybody know what does it mean?